Friday, June 27, 2014

Five for Friday: Instructables Edition

I spend a fair amount of time over at a site called instructables. If you don't know about instructables, you are definitely missing out. It's a site full of instructions (or instructables) on how to do, well, just about anything. From leather shoes for children to roasting pigs (caution: not for the weak of stomach but man do these guys know how to party) to 3D printed fingerprint scanning garage door access points this site has pretty much anything you might want to know about, all done by other folks around the world who just felt like sharing the different ways they've figured out how to do things. I even have my own page where I share various projects I've completed.

This Five for Friday I wanted to share five projects from instructables that I would love to do around our house.


Picnic Table


I would love some outdoor furniture. Of course, most of the sets we like are over two hundred bucks, which isn't ridiculous I suppose, it's just not in the budget right now. So, a picnic table is a great compromise. It might not be quite as "cool" or "fashionable" but it's classic and built to get beat to death by families and weather. It's also way more affordable.


Playground/Swingset


Okay, so I wouldn't necessarily build this exact playground. But it's certainly inspirational! And it provides a great jumping off point for building one myself, even if it doesn't end up being this grand. This is something that probably won't happen anytime in the too-near future; mostly because our yard jungle needs to be tamed first but I do think I would do my kids a disservice to not have some kind of swingset for them.


Shed


Isn't this the cutest shed! This looks like a rugged structure from which I could work on manly projects. This is the next BIG project I want to complete. I really don't want to keep my tools and lawnmower and weed eater in the corner of the yard under a tarp anymore. I also love the idea of having a shed with an overhang roof like this so that I could work outside but still be in the shade, and if I ever get a riding lawnmower I could park it under there.


Secret Door


This one is more of a joke... for now. There's just no place in our house to really utilize a secret door. However, in some future house I fully intend on creating some sort of hidey-hole nook or passageway that I can hide with a bookcase door or some other mysterious and secretive entryway.


Deck


We really feel like a deck would add TONS of value to our home, and I don't just mean resale value. In a small house, every square inch is precious and putting some useful ones in the back yard would be great. Besides, both of our kids seem to love the outdoors (though Grayson tends to like digging it up while Alice just enjoys staring at it) and it would be great to have somewhere outside where we could sit and watch to make sure they don't eat too much grass and dirt relax while they enjoyed the great outdoors.


Most of these projects are kind of big outside projects since that's sort of what's been running through my brain a lot lately. I may continue to hijack the Five for Friday post every once in a while to feature more instructables in the future. Next time maybe I'll feature some smaller projects, potentially more décor focused. We'll see. In the meantime, I hope you enjoyed this (first) edition of Five Instructables for Friday!

Wednesday, June 25, 2014

Take A Dip

This is one of those Projects That Almost Wasn't. Not quite dramatic enough to make the Pinterest Fail page... but it definitely didn't work out exactly the way I had intended.

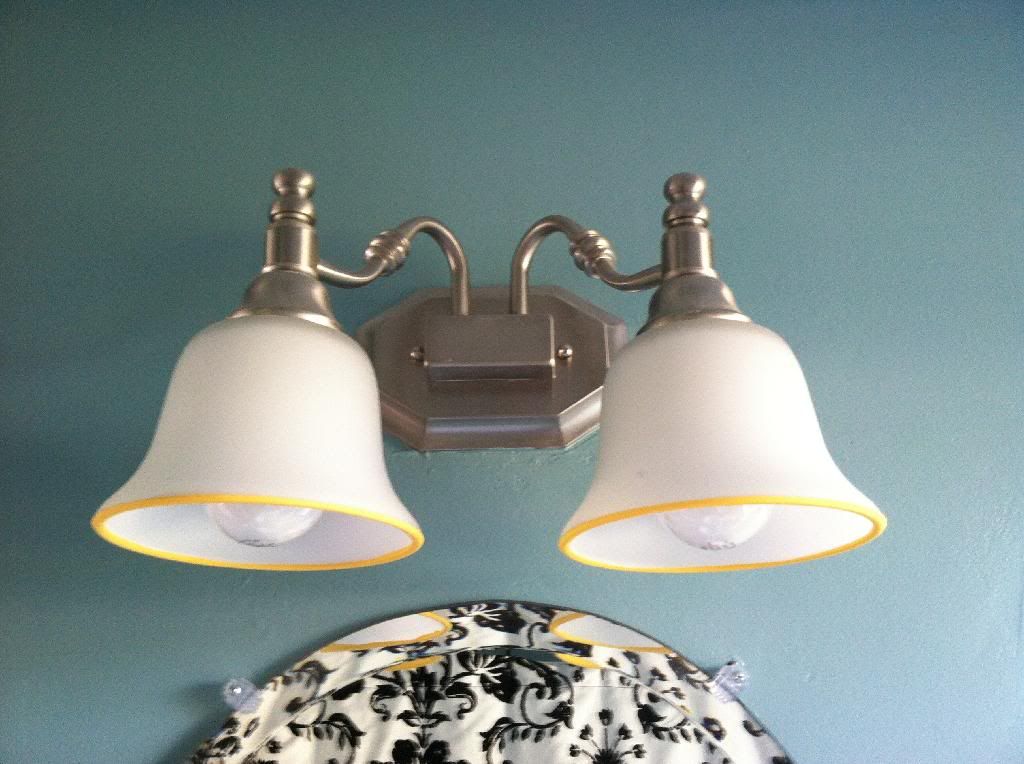
Our house came outfitted with these lights:


Bland. 

Meh. 

They're fine. Whatever. 

They could be lots worse:


We have a double set in the bathroom that I gave the teeny-tiniest update to:


Just dipped the rims in some yellow craft paint. I think they're kinda cute. 

Our hallway also has one of these light; a single one:


Now, I think this light is kind of odd to begin with. It looks stuck there, almost like an afterthought. Which it may well have been when someone realized that the space needed a light but the ceiling space is taken up by the door to the attic.


One day, if we put in stairs, we will get rid of the attic door and replace it with a real ceiling and run wiring for an actual hall light. But that is a good ways off. We've casually looked at wall mounted lights to replace this one, but we haven't seen anything that we really loved. To me, a lot of them just look like a porch light that you put inside. 

So, while we're waiting, I decided this light needed a tiny tweak. I thought it would look cool to dip the shade in white 
paint, similar to the bathroom light but...more!


I assumed that I could just dip the shade into the gallon of white latex-based paint that we had kicking around in the back of the closet. But...


...the shade was too fat. 

So, I thought, I'll pour the paint into a wider container (aka: a glass pie plate, cause...why not?).


It didn't coat as much of it as I had originally wanted, but I was just going with whatever worked at this point. (Inside I was already thinking, "I have ruined this lamp shade. It was fine bland and now I am making it aggressively unattractive.) 

My plan had been to hold the shade until the paint was set enough to leave it upside down on the table without it dripping. 

Well, no dice. 

If I had been smart, or just patient, I would have waited until Joseph was home so there was an extra pair of hands for lamp holding/child-minding.

But, lest you forget, I like to do things NOW! (Because my interests are mercurial and I am easily distracted.) 

So, thinking the paint was probably set "enough", I put the shade down so that I could change a diaper/fix a snack/play Firemen. 

Spoiler: it was not. 


When I checked on it a little while later, this is what I found:


I promptly texted Joseph:

Me: AHHHH! I can't do this! I ruined our boring light! And everything is painty and I'm a terrible person!

(Or something like that.)

I also sent him the above picture. 

He sent back:

Joseph: I'm confused because what you said sounds like it didn't turn out but the picture looks awesome.


...

How sweet. 

To me, it looked like Albino Cthulhu was eating my lamp shade.


Rrraawwrr! Nom-nom-nom-lamp...

I decided to just let it dry fully and then see what I could do. 

I knew I was going to have to remove the paint that had run down the inside of the shade; I didn't want to have swapped out a bland lamp for a fire hazard.  Once the paint was dry, I tried just peeling the drips off to see what happened. 

Oh, the magic of latex paint on glass; they came off perfectly. I still wasn't sold on the drippy look, no matter what my enabler supportive husband said. So, on a whim, I took a paring knife and, veeeery carefully, ran it around the top of the rim of paint, just below where the drips started. 

I don't have any pictures of this step because I was pretty sure this was A: not going to work, B: ruin my shade or C: all of the above. 

But, surprise, it did!

Pretty much. 


It's not exactly the "dipped" look I wanted, but it's much better than I thought it was going to look about halfway into this project. 

I hope writing this experience down will help me remember that, in the world of DIY, not everything works out perfectly. And for every amazing thing on Pinterest, there are dozens of "fails".

And we should hold up our mangled, gluey ball of twine (or poorly painted lamp shade) and say, "Yep. I tried. It didn't work.  I'm awesome anyway."


Friday, June 20, 2014

Five for Friday: Need for Swede

Maybe we have Ikea-hangover from our impromptu trip last Sunday:


The boys had fun with the sinks, while Alice just soaked in the wonder of it all:


Maybe all this Viking talk is going to our heads. 

Or maybe we're just super excited about Amy Pohler's new show.

Whatever the reason, this Friday, we've got Sweden on the brain. Now, unless you're throwing a theme party or getting in touch with your Scandanavian roots, you may say "Hey, now, I appreciate pickled herring and meatballs as much as the next person, but my life is in no way missing out on Swedish things." And we would say, "Ah, but you're wrong!" And we've made a list to help you realize how much you (and everyone else) needs more Swedes! (Or, rather, things from Sweden. You probably don't need more "Swedes", it just flowed with "needs" better. But, they do seem like a lovely people. Maybe we do all need more Swedes.) 


Can you make a list of cool Swedish things and not have something with a Dala horse? I submit that you can not. These come in a set of four (there's also a blue one, not pictured) for $42. But they're cute and kind of a subtle Swedish wink. 


Coffe with a Push. This is a twist on the traditional Swedish game Fia med Knuff, which is similar to Parcheesi. Joseph does not enjoy Parcheesi (he says there's too much left to chance and not enough strategy. My Magic Husband Decoder says he played once and didn't do very well. But, I could be wrong, sometimes it's faulty.) so, when we all get together to play this game, he's going to be in charge of making the coffee and Swedish Cinnamon Rolls (this game comes with a recipe!)


I would frame this "tea towel" and hang it on the wall. Or sew a bunch together into a quilt that I would huddle under while drinking glogg and reading Elsa Beskow books.

Or maybe I would just use it as a tea towel. But I would pat it affectionately, so that it would know it was my favorite. 


Arrows, they're so hot right now. But this is the first time I've seen them as wall hooks. It's a good look for them. 


Swedish Fish


Okay, this one is kind of a joke...

But after looking through all this Swedish stuff, how could I not want to go buy a giant bag and eat them by the handful? Maybe that's just me...
In Swedish they're called "pastellfiskar" (literally: pastel fish) and the red ones are apparently lingonberry flavored - I had always assumed they were cherry. Who knew!
Disappointingly, the ones you can buy in every grocery store and Target are made in Canada, but you can buy authentic Pastellfiskar at Ikea. 

Wasn't that fun? 
I don't know about you, but I'm feeling more cultured. And, also, more blond. 

Sadly, both of these are illusions. 

Any other suggestions on expanding our cultural horizons? Favorite Hungarian wall-hangings or Peruvian pastries? Please share!
 

Wednesday, June 18, 2014

Chalk It Up

"Chalk it up....chalk it up, you'll never stop..."

(Apologies to the Stones. And to anyone who heard me singing that while I worked on this project.)

We posted this picture on Instagram last week:


With the caption, "Consider our tickets for the Chalkboard Bandwagon purchased". 

Well, that was our ticket and this is our souvenir:


Our Awkward Wall is now our Chalk Board Wall!

A few weeks back we asked you guys some "Awkward Questions" and discussed our options for this weird little space. We got some different suggestions, but, ultimately, we just couldn't resist the siren call of the chalkboard paint. I mean, all the cool kids are doing it. 

All the cool kids also have tutorials on how to do it, which is great, so we'll keep the how-to portion of this post brief. 

(The directions on the can are pretty straight forward, as well.)

Essentially, we wiped down the wall with a damp rag (to get rid of any lingering dust or splotches that might keep the paint from adhering) then went over it again with a dry cloth. 


When it was fully dry, we applied the chalkboard paint very thinly with a two inch brush. A small roller would probably have worked well, but we didn't have one on hand and it's such a little space, we didn't feel like it was worth it to go out and purchase one. But if you've got one, great! 

Here's what it looked like after one coat:  


Lookin' good....

Well, maybe not...


The directions say you can recoat in four hours, so that's what we did! We were careful, since we were just using the brush and not a foam roller, to keep our brushstrokes going the same direction, up and down, to avoid overworking the paint and leaving splotchy marks. We also worked from top to bottom, so we weren't leaning against wet paint while we worked on the top. 

And here it is after the second coat: 


Much better. 

We assumed we'd be doing a third coat but, it looked so good after two, we called it done. 

A few things we noticed about the paint itself: it's pretty thin. We were expecting the consistency to be similar to regular house paint, but it was much waterier. Which meant we had to be mindful of not loading up the brush with too much paint so we wouldn't drip. Also, probably because it's so thin, it dries very quickly. The container says it "dries to the touch in 30 minutes" but we noticed it drying while we were still painting, probably less than ten minutes, which is why we were very careful about working in one direction. 

After the second coat was fully dry, it was time to "prep" or "condition" the chalk board. (This makes the board more "eraser-friendly". If you don't condition first, the chalkboard can just kind of soak up the chalk while you're drawing and it much more difficult, sometimes impossible, to fully erase. Conditioning it gives the new, "thirsty" chalkboard something to soak up first and keeps your drawings from "sticking"; almost like oiling a pan.)

Anyway, we grabbed some white chalk (you can use any color, but we thought white was a little less messy.) and, for easier clean up, we threw down an old sheet to catch some of the chalk dust. All you do to condition your chalkboard is rub the chalk aaaallll over it. We did it once vertically:


And once horizontally:


Til we had a beautiful blizzard happening. (It took about two full pieces of chalk.) 


And then took a soft rag (we actually used a dust cloth) and rubbed all that chalk in. 


This was messy. There was lots of chalk dust. It was not enjoyable. 

But it went quickly and the clean up was a breeze (just ball up sheet, throw in washer) and then...


...it was done!

And you know I just had to break it in...


What? Do dishes while my kids nap? Pay some bills? Nah, I'm just gonna doodle over here in the corner. 

And then someone else wanted to test it, as well. 


"This is Saturn," he told me. "And here are it's rings. They go round and round and round and round..."

Yeah, we're having a good time. 

Tuesday, June 17, 2014

Gettin' Sketchy

So, this past month saw my birthday and the inevitable end of my twenties.


*tear* 

Okay,I wasn't really as broken up about that as this picture may lead you to believe. 

When my wife started planning the party, she decided to invite my rather enigmatic friend Mike Q who, I should mention, lives in New York. He was the only out of state guest she invited, mostly because she figured if anyone would respond to a random birthday party invite from a friend several states away it would be him.

As is to be expected for Facebook events, he never sent an RSVP confirming whether or not he would be there. However, in texting back and forth about some unrelated topic he led me to believe that he would not be coming. Bummer, but I figured it was a long shot.

The day of the party arrived and a short while into the party itself I heard someone say, "Is that Mike?"

Skip past the "squeeing", the running outside, the hugs...

While Mike was there we talked about the house a bit and the various things we could do to it. His dad is a contractor and he has quite a bit of insight into that kind of thing (or at least more than I have). Most notably, we discussed the possibility of putting stairs in and finishing the attic.

A couple days later, I get a text message from Mike asking me for my house measurements. No explanation. Once I sent them (which took me way too long because I am a procrastinator and also who knew it took so long to measure a house filled with stuff and kids?) I got an e-mail back with this super cool video:


Obviously there have been some major "tweaks". Some of these we had talked about and some of these were fun additions Mike threw on (like that second peak and the full porch). The stairs were the part that I was excited about. They fit! It can be done! So, whatever we end up doing at least I know that it's an option.

I'm also excited because he included the file so I can play around with it myself. I've downloaded Sketchup (which is what he used to make it) but I haven't had a chance to really mess around yet. Once I get a chance maybe I'll share my experience.

Has anyone else used sketchup? What did you think about it? Or have you ever put in stairs? Want to help?

Friday, June 13, 2014

Five for Friday: Sentimental Sides

One of our very favorite things that has come about, kind of by accident, since we bought this house is this sort of "homeowner camaraderie" with our dads. It's fun to be able to talk shop with them about the various projects we have going on, get their input, borrow their tools, hear about the experiences they went through buying and caring for their homes. I've heard stories I somehow never heard before and we have a whole new appreciation for that side of our dads; you know, that "I'm not hiring someone else to fix my house when by golly I can do it myself" side (and occasionally that "holy cow I'm going to have to hire someone to fix this because it's way over my head" side).

Now, just to be clear, this isn't going to be some weepily poetic ode to fathers (not knocking them though, I've teared up many a time... on second thought let's not go there), this is still a Five for Friday after all. We just wanted to explore some thoughts on gifts for Father's Day that might focus less on the mainstream consumerist mindset and a little bit more on the sentimental side.

So, no ties to add to the collection that never gets worn (my dad hates them... and collars... and top buttons). No cordless drills. No pocket knives. And nothing to add to that little box of pins and coins and unused tie clips on the top of his dresser.

Here's five gifts we think sound pretty cool:


Custom Recipe Art


Alright, so I realize this one won't necessarily work for everyone. For instance if your dad's mom wasn't the homemaker type it might not be terribly meaningful. But maybe she was. Maybe she had some recipe that your dad just loved as a kid or at least brings back fond memories of his childhood. Or maybe your mom has some recipe that she used to cook when your parents were first married. You could get that turned into (or possibly do it yourself) something that could hang on the wall and be enjoyed even when it's not being eaten.


Updated Slides or Home Movies


This is one I've actually done, though I didn't use the above linked company (F.Y.I I have no experience with them, they just came up on a search). I took a brown paper bag of old silent family films to a local shop and had them transfer them all to DVD. It was pretty cool especially since I hadn't seen the footage in over twenty years myself.


Prints of Old Family Photos


via


At places like Staples or Kinkos you can get "engineer prints" (also referred to as blueprint or draft copies) as big as 3'x4' for pretty cheap. Each place seems to price them a little differently but at the largest size the price range seems to be about $5-10. You could simply frame them like that or use them to decorate some other grander item (to give as a gift) like Elsie of A Beautiful Mess at the above link.


Framed Blueprints


via


Did you know that any time a house gets built the builder has to submit a copy of the blueprints when he applies for building permits? Did you also know that you can obtain copies of the same blueprints from the office of public records for a fee? That means that (depending on the age of the house) you could look up blueprints for the house your dad grew up in, the first house your parents bought as a couple, or maybe plans to the house your dad built or had built. Get it framed and you have a pretty awesome, and touching, gift.


Homemade Gifts


Not enough could be said about making something for your dad with your own two hands. Not only is it sentimental because it's custom made by a son or daughter for their dad but it also says, "Look dad, you raised a capable adult human possessing enough skills to provide for themselves" and if that doesn't make a dad proud I don't know what would. I've made a couple things that could make good fatherly gifts (a leather wallet and a leather journal). Meredith's great grandmother made a a quilt out of suits from the men in the family (which is apparently also the type of thing they could donate to a museum one day). To make it even more meaningful pair you could make something tied in with an old keepsake. Like a camera case for an old camera your dad got from his dad. Or you could restore a rusted keepsake pocket knife and make a case for it. Or build a shadow box frame and mount a family heirloom like an antique pocket watch in it. The possibilities are nearly endless.


So, those are just some ideas to get you thinking about some ways to celebrate the holiday in a new and creative way. Happy Father's Day everyone!

Wednesday, June 11, 2014

All Around the House


Ba-bada-ba! Bada-ba-bada-ba-ba!

We are celebrating this week; it is our one year anniversary (what?!) of living in our little blue house. (The above "ba-bada-ba" was my attempt at transcribing a glorious fanfare. Or, maybe a fanfare played by a lone woman on a kazoo.) 

It's a little bit of a shock; it certainly doesn't feel like an entire year has passed. (Wasn't it just yesterday we were picking up our keys and unpacking boxes?) 


Well, in honor of our House-iversary, we would like to invite you to take a walk with us on our Very First (super-awkward, mildly cringe-inducing) House Tour Video! 


Well, actually, that's not quite true. You see, while uploading some pictures the other day, we came across, not one, but two (!!) House Tour videos (well, one's more of a "yard tour") that we shot last year, the day after we closed on this house. 

And, we thought, what the heck, these videos are so incredibly dorky and embarrassing, let's put them on the Internet! And, then, let's make another one and share that, too!

So, that's exactly what we did. 


Some things you'll see in these first two include:

- Our house almost totally empty except for our bedroom, which is where we stored tools. 

- My five-month baby Alice bump. 

- Our backyard nearly bamboo-free. (Oh, but it's still there, it's just waiting...)

- Our front yard, with all of its original trees, bushes, "landscaping rocks" and weeds still intact. 

-  The "Ghost Door".


Now that you've seen the previously unreleased "First House Tour", here's this years Updated (but still majorly in progress) House Tour Video: 


Some of the gems included in this new video tour are:

- Just under seven minutes of me talking too fast while trying to recall what we've been working on over the past year. 

- A chair is tripped over. 

- Me, seriously over-using the word "fantastic". 

- Us completely leaving out big chunks of things we've done (i.e. tearing up the walk and the random arrows in Grayson's room). 

For a more in-depth breakdown of every project and tweak, we've also added a House Tour page. Like sand through the hourglass everything else in our lives, the page is still majorly a work in progress, but we'll be updating it regularly so, hopefully, things will be a little more put together over there soon. 

Well, we've definitely got a lot of work ahead of us, but looking back at what we've done so far just makes me feel like, "Yeah, we got this!" Then Joseph and I high-five each other and immediately pretend we didn't just do that.

Sunday, June 8, 2014

Goo (Be)gone!

The people who used to live here were Christmas light enthusiasts.


No, we've never actually met them, but they left us some tell-tale signs: a few nails tacked into the shingles of the roof and these:


Squares that have long ceased to be sticky and are now crusty, yellow splotches roughly the consistency of cement. Or diamonds. 

Now, if we were also Christmas light enthusiasts, this might be okay. We'd nail our own lights to the roof (except we wouldn't, because that's just not a good idea) and cover those crusty squares with our own plastic hooks. But, alas...we are not. 

So these once-useful little tabs are now just...house boogers. 

(Ew, did I really just type that? Should I delete it? Gross.)

But...they are gross! 

We've already lived with them for a year, but this weekend I was over it. They were coming down. By any means necessary. 

We first tried just plain old soap and water. 


Meh. Not a lot happened, as you can tell by my "not impressed" face. 

Then we brought out the bleach (diluted with water). 

Which worked no better than the plain soap and water and smelled much worse. (Does bleach smell like old socks to anyone else? Oh, my goodness, boogers and old socks in one post. My mother is so proud right now.)

Next up, we broke out the Big Guns: Goo Gone. Which smells great, by the way. Mmm, chemicals. 


The way the Goo Gone works ( as it says on the label) is you apply it directly to the, uh, "goo" and then let it sit for " a few minutes" - I left it on for about five - then, using a "clean" "white" rag, you scrub it til it kind of flakes away. They specify "clean" and "white" for a reason, as I learned the first time I tried it. I read "clean" and "white" and thought, "Surely 'dirty' and 'red'  are the same thing."

Well, let me tell you, they are not. 


Whatever removes the "goo" apparently also leaches any color from whatever rag you're using and smears it all over your "was clean a second ago, but now is coated with red-ish grime" surface. 

But, thankfully, a little more Goo Gone (applied with the correctly specified kind of cloth) removes that residue, too. Yay!

So, the Goo Gone worked like a dream on they sticky pads adhered to our vinyl flashing. But...not so well on the ones above our porch, where it's painted aluminum. 


This was after ten minutes of letting it sit and a few more of hard scrubbing. 

It's still the best way we've found to de-sticky pad our house, but it takes a lot of elbow grease. Not that the results aren't totally worth it. 

We've still got a few more hanging around, so if anyone has any suggestions, we'd love to try some other techniques! 

In the meantime, I'm going to go make some cocoa and watch a Chevy Chase movie. Oh, wait, it's 90 degrees outside...make that some lemonade and Blue Hawaii. 

Friday, June 6, 2014

Five for Friday: Art Attack!


Note: So, I said this last week, but I figured it should probably become a "thing" that goes here. (Also, I just really love putting things in italics.) For the record, none of the products/links on any Five for Friday posts are affiliated with us. They are purely things we enjoy (or dream of enjoying one day). 

Our walls have been feeling a little bare. I tend to think of hanging pictures as a final decorating touch; something not to be done until everything else is finished, like adding sprinkles on a cupcake. However, I'm beginning to think that I'm wrong. Or...I've just gotten impatient. I don't want to wait! I want sprinkles now!


So, here are five things that I would love to hang on our walls:


This print from Help Ink:

via


In addition to having really beautiful art, they also donate a portion of each sale to the charity of your choosing. And they print on wood, in addition to high-quality paper, which I think is super cool.


Thiebaud Calendar:


via

Thiebaud prints are kind of hard to find. So, when I came across this calendar on Amazon I was super excited. It's like getting twelve prints for $11, which is a pretty amazing deal. 


Ikea Trees Print:

via


I love the colors in this and it's  fun without feeling too cutesy. Also, it's $12 (!!!).


Etsy Feathers:


via


I mean, who doesn't love feathers? Joseph actually found this one and when he showed me all I said was, "Yes!"


Ali Cavanaugh Print:

via


This last one is on the pricey side ($100 for a 12x12) but her work is just beautiful.   Or maybe I just secretly covet those socks... 


So, yes, I think I'm finally going to get past my "Wait! You can't hang art yet! You're not done! You're not at the sprinkle phase!" way of thinking and order some art! 

Anything you guys can't wait to hang? Or already have up and are loving? Share!