Showing posts with label Projects. Show all posts

Wednesday, June 25, 2014

Take A Dip

This is one of those Projects That Almost Wasn't. Not quite dramatic enough to make the Pinterest Fail page... but it definitely didn't work out exactly the way I had intended.

Our house came outfitted with these lights:


Bland. 

Meh. 

They're fine. Whatever. 

They could be lots worse:


We have a double set in the bathroom that I gave the teeny-tiniest update to:
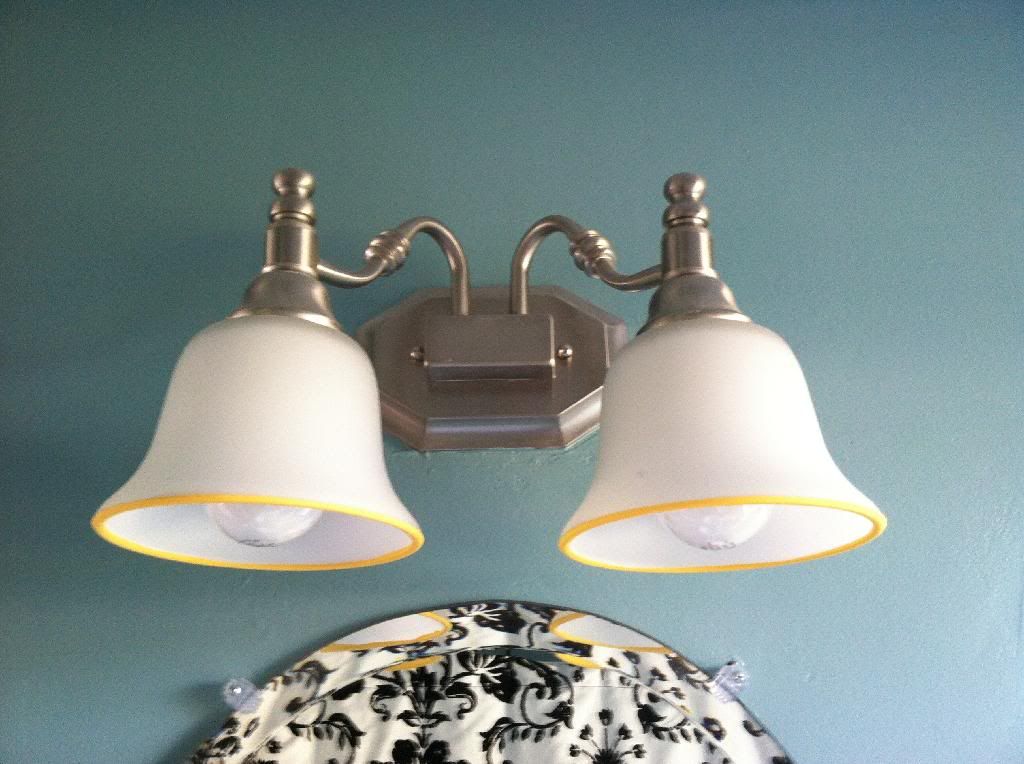


Just dipped the rims in some yellow craft paint. I think they're kinda cute. 

Our hallway also has one of these light; a single one:


Now, I think this light is kind of odd to begin with. It looks stuck there, almost like an afterthought. Which it may well have been when someone realized that the space needed a light but the ceiling space is taken up by the door to the attic.


One day, if we put in stairs, we will get rid of the attic door and replace it with a real ceiling and run wiring for an actual hall light. But that is a good ways off. We've casually looked at wall mounted lights to replace this one, but we haven't seen anything that we really loved. To me, a lot of them just look like a porch light that you put inside. 

So, while we're waiting, I decided this light needed a tiny tweak. I thought it would look cool to dip the shade in white 
paint, similar to the bathroom light but...more!


I assumed that I could just dip the shade into the gallon of white latex-based paint that we had kicking around in the back of the closet. But...


...the shade was too fat. 

So, I thought, I'll pour the paint into a wider container (aka: a glass pie plate, cause...why not?).


It didn't coat as much of it as I had originally wanted, but I was just going with whatever worked at this point. (Inside I was already thinking, "I have ruined this lamp shade. It was fine bland and now I am making it aggressively unattractive.) 

My plan had been to hold the shade until the paint was set enough to leave it upside down on the table without it dripping. 

Well, no dice. 

If I had been smart, or just patient, I would have waited until Joseph was home so there was an extra pair of hands for lamp holding/child-minding.

But, lest you forget, I like to do things NOW! (Because my interests are mercurial and I am easily distracted.) 

So, thinking the paint was probably set "enough", I put the shade down so that I could change a diaper/fix a snack/play Firemen. 

Spoiler: it was not. 


When I checked on it a little while later, this is what I found:


I promptly texted Joseph:

Me: AHHHH! I can't do this! I ruined our boring light! And everything is painty and I'm a terrible person!

(Or something like that.)

I also sent him the above picture. 

He sent back:

Joseph: I'm confused because what you said sounds like it didn't turn out but the picture looks awesome.


...

How sweet. 

To me, it looked like Albino Cthulhu was eating my lamp shade.


Rrraawwrr! Nom-nom-nom-lamp...

I decided to just let it dry fully and then see what I could do. 

I knew I was going to have to remove the paint that had run down the inside of the shade; I didn't want to have swapped out a bland lamp for a fire hazard.  Once the paint was dry, I tried just peeling the drips off to see what happened. 

Oh, the magic of latex paint on glass; they came off perfectly. I still wasn't sold on the drippy look, no matter what my enabler supportive husband said. So, on a whim, I took a paring knife and, veeeery carefully, ran it around the top of the rim of paint, just below where the drips started. 

I don't have any pictures of this step because I was pretty sure this was A: not going to work, B: ruin my shade or C: all of the above. 

But, surprise, it did!

Pretty much. 


It's not exactly the "dipped" look I wanted, but it's much better than I thought it was going to look about halfway into this project. 

I hope writing this experience down will help me remember that, in the world of DIY, not everything works out perfectly. And for every amazing thing on Pinterest, there are dozens of "fails".

And we should hold up our mangled, gluey ball of twine (or poorly painted lamp shade) and say, "Yep. I tried. It didn't work.  I'm awesome anyway."


Wednesday, June 18, 2014

Chalk It Up

"Chalk it up....chalk it up, you'll never stop..."

(Apologies to the Stones. And to anyone who heard me singing that while I worked on this project.)

We posted this picture on Instagram last week:


With the caption, "Consider our tickets for the Chalkboard Bandwagon purchased". 

Well, that was our ticket and this is our souvenir:


Our Awkward Wall is now our Chalk Board Wall!

A few weeks back we asked you guys some "Awkward Questions" and discussed our options for this weird little space. We got some different suggestions, but, ultimately, we just couldn't resist the siren call of the chalkboard paint. I mean, all the cool kids are doing it. 

All the cool kids also have tutorials on how to do it, which is great, so we'll keep the how-to portion of this post brief. 

(The directions on the can are pretty straight forward, as well.)

Essentially, we wiped down the wall with a damp rag (to get rid of any lingering dust or splotches that might keep the paint from adhering) then went over it again with a dry cloth. 


When it was fully dry, we applied the chalkboard paint very thinly with a two inch brush. A small roller would probably have worked well, but we didn't have one on hand and it's such a little space, we didn't feel like it was worth it to go out and purchase one. But if you've got one, great! 

Here's what it looked like after one coat:  


Lookin' good....

Well, maybe not...


The directions say you can recoat in four hours, so that's what we did! We were careful, since we were just using the brush and not a foam roller, to keep our brushstrokes going the same direction, up and down, to avoid overworking the paint and leaving splotchy marks. We also worked from top to bottom, so we weren't leaning against wet paint while we worked on the top. 

And here it is after the second coat: 


Much better. 

We assumed we'd be doing a third coat but, it looked so good after two, we called it done. 

A few things we noticed about the paint itself: it's pretty thin. We were expecting the consistency to be similar to regular house paint, but it was much waterier. Which meant we had to be mindful of not loading up the brush with too much paint so we wouldn't drip. Also, probably because it's so thin, it dries very quickly. The container says it "dries to the touch in 30 minutes" but we noticed it drying while we were still painting, probably less than ten minutes, which is why we were very careful about working in one direction. 

After the second coat was fully dry, it was time to "prep" or "condition" the chalk board. (This makes the board more "eraser-friendly". If you don't condition first, the chalkboard can just kind of soak up the chalk while you're drawing and it much more difficult, sometimes impossible, to fully erase. Conditioning it gives the new, "thirsty" chalkboard something to soak up first and keeps your drawings from "sticking"; almost like oiling a pan.)

Anyway, we grabbed some white chalk (you can use any color, but we thought white was a little less messy.) and, for easier clean up, we threw down an old sheet to catch some of the chalk dust. All you do to condition your chalkboard is rub the chalk aaaallll over it. We did it once vertically:


And once horizontally:


Til we had a beautiful blizzard happening. (It took about two full pieces of chalk.) 


And then took a soft rag (we actually used a dust cloth) and rubbed all that chalk in. 


This was messy. There was lots of chalk dust. It was not enjoyable. 

But it went quickly and the clean up was a breeze (just ball up sheet, throw in washer) and then...


...it was done!

And you know I just had to break it in...


What? Do dishes while my kids nap? Pay some bills? Nah, I'm just gonna doodle over here in the corner. 

And then someone else wanted to test it, as well. 


"This is Saturn," he told me. "And here are it's rings. They go round and round and round and round..."

Yeah, we're having a good time.